This guideline works with Microsoft Windows only!
Please be aware that these steps will recover your LS400, but we cannot guarantee the data will still be
stored on the device after the recovery. If you wish to recover data please contact the support team to discuss possible avenues and warranty
information before following the steps below.
1. Please download all needed files from the links below:
-
Firmware-
TFTP Image-
NAS Navigator
2. Once these files have been downloaded, extract them to your desktop. Now connect the LinkStation directly to your PC with an Ethernet cable
and set a static IP address on your PC by doing the following:
Windows XP:
Go to Control Panel -> Network Connections -> right click the Local Area Connection icon -> select Properties ->
Internet Protocol (TCP/IP) -> select Use the following IP address:
IP address: 192.168.11.1
Subnet mask: 255.255.255.0
Leave the Default gateway and DNS blank and click OK > OK.
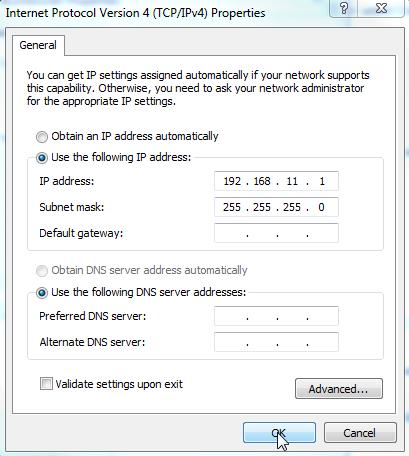
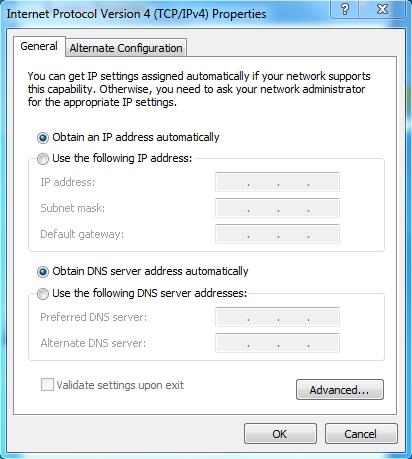
Windows Vista/7/8:
Go to Control Panel -> Network and Sharing Centre -> Select Change Adapter Settings (left hand side menu) ->
right click the Local Area Connection icon -> Properties -> Internet Protocol ver.4(TCP/IPv4) -> Use the following IP address:
IP address: 192.168.11.1
Subnet mask: 255.255.255.0
Leave the Default gateway and DNS blank and click OK -> OK.
3. Turn off any other network adaptor like wireless or any secondary Local Area Connection you may have running on your PC and deactivate all
antivirus and firewall software (including the Windows firewall).
4. Turn on your LS400 now and check for your Local Area Connection to become active (you can ignore messages regarding no Internet
connection).
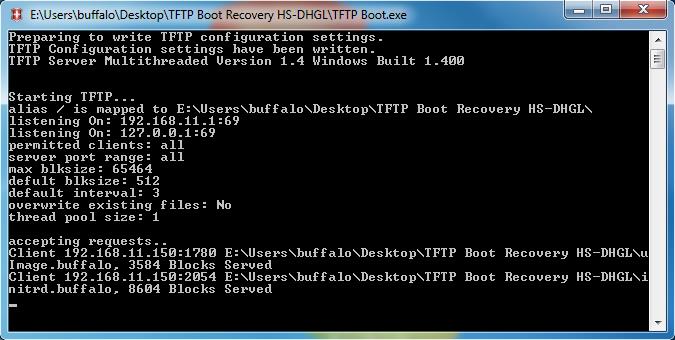
5. Run the "TFTP Boot.exe" file (this will open a blank screen), once it is stuck at "accepting requests.." press the FUNCTION button on the
LinkStation for 2 - 3 seconds so that the red error light will change to white.
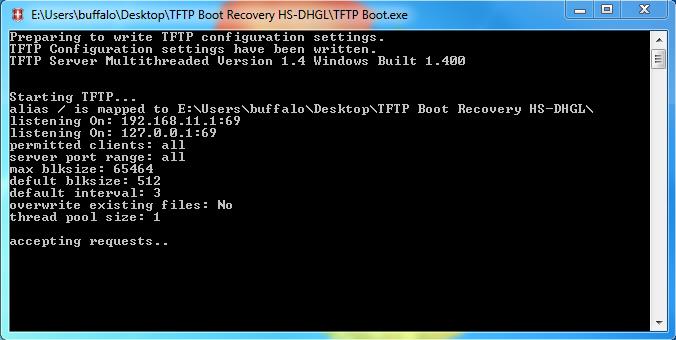
After a couple of minutes you should see two sets of blocks being passed on to the LinkStation, once this has happened wait for the power light
to become solid.
6. Open the NAS Navigator software, it might ask you if you want to automatically change the time and IP address, click NO.
If the unit shows an IP of192.168.11.150 skip to step 7.
a) In the NAS Navigator you might notice the LinkStation IP address has changed to something similar like: 169.254.*.* and it will
be reported as being in "Emergency mode".
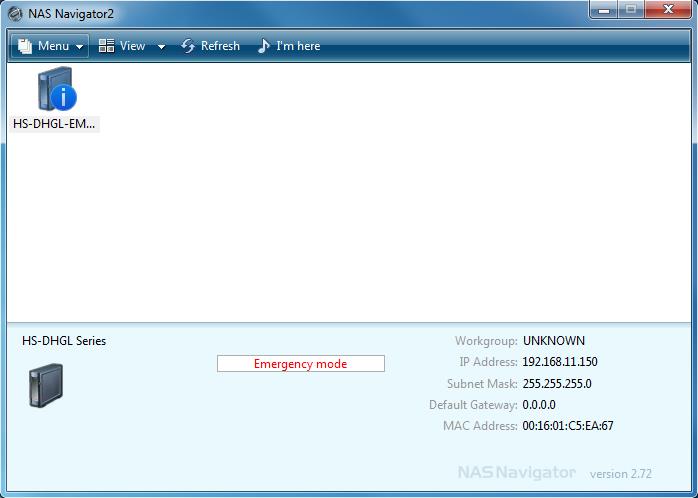
b) The displayed IP address will need to match the range on the PC (at the moment 192.168.11.1) to successfully reinstall the
firmware.
c) Use the same steps as above for changing the IP address on the PC again if the LS400's IP address is not in range.
d) If the IP address looks like: 169.254.127.15 and the Subnet mask like: 255.255.0.0
e) You need to configure the PC to: 169.254.127.16 and the Subnet mask as: 255.255.0.0
7. Open the Firmware folder on your Desktop and double click on the "LSUpdater.exe" file and a utility will appear stating the
units IP Address, Hostname etc.
Click "Update" and this should start the firmware transfer (this process should take no more than 10 - 15 minutes) and the LinkStation
will automatically reboot after the firmware update has completed.
8. If the unit reverts back to the 6x short red flashing error LED, repeat the TFTP process above, and once the TFTP loader has passed the two sets
of blocks the LinkStation LED should start flashing orange info 2x slow + 5x fast, for firmware updating, if this is the case leave the unit for
up to 30 minutes to complete the internal update.
This should have recovered your LS400 and you should have access again.
9. Do not forget to change your PC's IP address back to you original settings when connecting it back to your network.
Those would usually be the automatically assigned once:
ouldn confirm whether partition exists
If during the firmware update you get an error similar to ouldn confirm whether partition exists please follow the steps below:
1) Within the extracted firmware folder open up LSUpdater.ini in Wordpad or Notepad.
2) Modify it as follow:
[Flags]
VersionCheck = 0 (modify this line from 1 to 0)
NoFormatting = 0 (modify this line from 1 to 0)
[SpecialFlags] (add this line)
Debug = 1 (add this line)
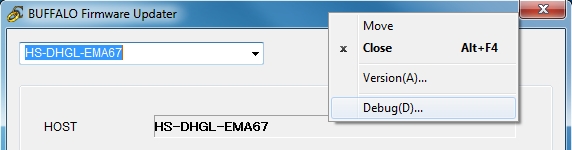
3) Save the modifications and start the LSUpdater.exe file. Right click the title of the Updater window and select "Debug (D)" (This will
bring up the Debug options in a new window)
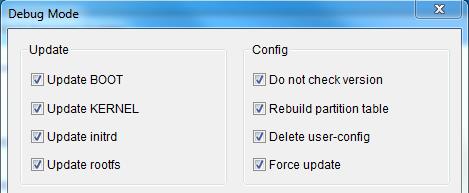
4) Ensure all options on the left hand side are selected, on the right hand side select all options including "Rebuild/Erase Partition Table"
Selecting this option will erase any data on the unit!
5) Click OK and proceed with the update.
Once the firmware transfer has started, if the unit reverts back to the error code E06, repeat the TFTP process above, and once
the TFTP loader has passed the two sets of blocks the LinkStation should state the info code I25, for firmware updating. If this is
the case, leave the unit for up to 30 minutes to complete the internal update.
Additional issues
If you come across any errors then please send the following
screen shots attached as a jpg or pdf.
1. The TFTP loader screen.
2. The NAS Navigator.
3. In Command Prompt (All Programs > Accessories) type ipconfig and press enter (we need to see the settings of the
"Ethernet Adaptor Local Area Connection").
4. Any error you get when reinstalling the firmware.
5. Also confirm if any red/orange light is shown on the unit once this process has been carried out and also the code which is showing.
